Hotkeys and settings
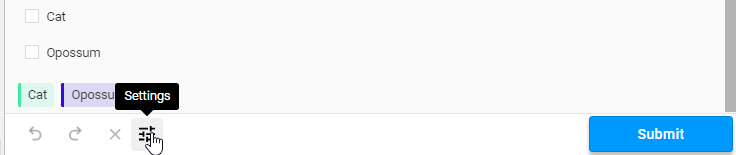
You can configure your settings and find out which hotkeys are available by clicking Settings from within a labeling task:
Tip
There are multiple options in the settings that allow you to display the hotkeys directly in the labeling interface, so you do not need to memorize any keyboard shortcuts. For more information, see Configure your labeling settings.
Use keyboard shortcuts
Use keyboard shortcuts, or hotkeys, to improve your labeling performance. When performing a labeling task, click the settings icon to see more details about hotkeys or to enable or disable hotkeys.
This table describes the hotkeys for a standard keyboard. For a Mac keyboard, use Return instead of Enter, Command instead of Control, Delete instead of Backspace, and Option instead of Alt.
| Key | Description |
|---|---|
ctrl + enter |
Submit a task. |
alt + enter |
Update a task. |
ctrl + backspace |
Delete all regions. |
escape |
Exit relation mode or unselect a selected region. |
backspace |
Delete a selected region. |
alt + r |
Create a relation between regions, when a region is selected. |
alt + . |
Cycle through all regions in the order listed on the regions’ sidebar. |
alt + h |
Hide a selected region. |
ctrl + d |
Duplicate a selected region. |
u |
Unselect a selected region. |
shift + down |
On the Data Manager, change the row selection to the next row, 1 below the current row. The quick view for the selected task row appears automatically. |
shift + up |
On the Data Manager, change the row selection to the previous row, 1 above the current row. The quick view for the selected task row appears automatically. |
shift + right |
On the Data Manager, open the labeling quick view for the selected task row. |
shift + left |
On the Data Manager, close the labeling quick view for the selected task row. |
Other annotation types have labeling-specific shortcuts, such as numbers to select specific labels for named entity recognition tasks.
Image-specific hotkeys
When labeling image data types with the Rectangle, BrushLabels, Ellipse, Polygon, or KeyPoints tags, you can use specific hotkeys to take image labeling-specific actions.
| Key | Description |
|---|---|
alt + left arrow |
Rotate the image to the left. |
alt + right arrow |
Rotate the image to the right. |
ctrl + + |
Zoom in to the image. |
ctrl + - |
Zoom out of the image. |
v |
Select the mouse arrow in the toolbar. |
h |
Select the pan option in the toolbar. |
k |
Select the key point option in the toolbar. |
r |
Select the rectangle option in the toolbar. |
shift + r |
Select the 3-point rectangle option in the toolbar. |
o |
Select the ellipses option in the toolbar. |
p |
Select the polygon option in the toolbar. |
b |
Select the brush option in the toolbar. |
e |
Select the eraser option in the toolbar. |
[ |
When the brush or eraser option is selected, decrease the size of the brush or eraser. |
] |
When the brush or eraser option is selected, increase the size of the brush or eraser. |
Time series-specific hotkeys
When labeling timeseries data with the TimeSeries tag, you can use specific hotkeys to take actions on a selected region on the time series data.
| Key | Description |
|---|---|
left arrow |
Expand the region area to the left. |
right arrow |
Expand the region area to the right. |
alt + left arrow |
Decrease the region area on the left. |
alt + right arrow |
Decrease the region area on the right. |
shift + left arrow |
Expand the region area by a larger amount to the left. |
shift + right arrow |
Expand the region area by a larger amount to the right. |
shift + alt + left arrow |
Decrease the region area by a larger amount on the left. |
shift + alt + right arrow |
Decrease the region area by a larger amount on the right. |
Video-specific hotkeys
When labeling video data with the Video tag, you can use specific hotkeys to take video-specific actions.
| Key | Description |
|---|---|
alt + spacebar |
Play or pause video. |
alt + left arrow |
Rewind one frame. |
alt + right arrow |
Fast forward one frame. |
Enable hotkeys for labels
By default, labels also have hotkeys. For example, pressing 1 on your keyboard applies the first label listed in the labeling configuration.
You can use the labeling settings to disable this behavior or ensure that the hotkeys are visible:
- Labeling hotkeys – Enables hotkeys for labels and choices.
- Show hotkeys on labels – If hotkeys for labels and choices are enabled, this will display the hotkey value next to the option.
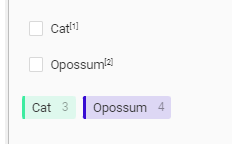
For example, in the screenshot below, both settings are enabled. Pressing 1 would select the “Cat” choice and pressing 4 would select the “Opossum” label.
Customize hotkeys
You can specify custom hotkeys for labeling using the Shortcut tag, or change the hotkeys used for specific actions using an environment variable.
If you are using an on-prem deployment of Label Studio and want to change the hotkeys used for specific actions, set the EDITOR_KEYMAP environment variable with valid JSON in your .env file or when starting Label Studio. For example, to change the keyboard shortcut used to submit an annotation to shift + s, set the environment variable as follows:
EDITOR_KEYMAP='{"annotation:submit":{"key": "shift+s","description": "My Custom Submit Hotkey!"}}'This overwrites the existing hotkey mapping with your custom mapping.
Refer to the full list of customizable hotkeys in the keymap.json file to update a different hotkey combination.
You cannot use this environment variable to remove an existing or add a new keyboard shortcut.
Configure your labeling settings
Click the settings icon when labeling to configure the labeling interface to suit your labeling use case:
The following options are available:
| Field | Description |
|---|---|
| Labeling hotkeys | Enables hotkeys for choices and labels. For example, pressing 1 selects the first label. |
| Show hotkeys on labels | Display the hotkey next to the label name. |
| Show hotkeys on tooltips | When hovering over options in the labeling interface tool set, display the hotkeys for each option. |
| Show region labels | When applying regions to data, by default the region is identified by its color coding. Enable this option to also show the corresponding label name next to the region. |
| Keep label selected after creating a region | Allows continuous region creation using the selected label. |
| Select region after creating it | Automatically selects newly created regions. |
| Show line numbers | Identify and reference specific lines of text in your document. Only applies when annotating text. |
| Keep selected tool | As you move between tasks, this will keep the same segmentation tool selected between tasks. Only applies when annotating images. |
| Pixel smoothing on zoom | Smooth image pixels when zoomed in. Only applies when annotating images. |